Hello World, this is an email - Part 5
What's the first thing you do when setting up as an indie gamedev? Why, set up a mailserver, of course! This is Part 5 (the final part!) of the process I went through, where we validate incoming mail with SPF, DKIM, and DMARC, and set up our own mail to pass the same checks...
If you're here from Part 4, welcome back. If not, you've joined in the middle of me documenting the rather lengthy journey I took from an empty server to one handling email with TLS, spam and virus checking, mail accounts handled in a database, and with SPF, DKIM, and DMARC checking and compliance.
Part 5 covers that final section, getting our Postfix installation to check SPF records, DKIM signatures, and DMARC policies to help filter out forged emails and spam. We also implement our own SPF and DMARC policies, and start adding DKIM signatures to outgoing mail, to avoid looking dodgy ourselves. We also make sure that our forward and reverse DNS lookups match.
Not looking like spam
We can now send and receive mail using a mail user agent. Postfix, Dovecot, Postgres, Amavis, and ClamAV are all doing their thing to make sure mail ends up in the right place. The only thing remaining is to take steps to make it hard for spammers to hijack your domain to send unwanted messages. Doing this is good for everyone else, but the more steps we put in place to prevent spam, the more mailservers receiving our actual mail can be confident that they're receiving something legit. So the more we do here, the more we can ensure that our outgoing emails aren't incorrectly flagged as spam (I'm going to assume that you're not actually a filthy spammer :p). There are four things we can look at here - a reverse DNS lookup, SPF, DKIM, and DMARC, and we'll tackle them in that order. As we go, we'll also add support for checking these things on incoming mail, too.
There's a handy service I've used which helps you get your mail set up looking genuine, called verifier.port25.com - unsurprisingly, this is run by a company that provides mail services and software, but they also have a nifty tool for checking your email. Send an email to check-auth@verifier.port25.com, and you'll get a reply back telling you about various checks it ran on your email to see if it looked legit. You'll get a section like this:
SPF check:          none
"iprev" check:      fail
DKIM check:         none
SpamAssassin check: ham
Note that they're using SpamAssassin too! "ham" is the opposite of spam, i.e. mail that looks OK. However, we don't have any SPF or DKIM checks, and you might be failing the "iprev" check.
Reverse DNS checking
The iprev check works like this - you send a mail, and your mailserver announces that the mail is coming from mail.example.com. The receiving end checks your DNS record to resolve mail.example.com to check the IP address matches the IP of your server. This should work fine. It will then do a reverse DNS lookup - it will look for a PTR (Pointer Record) DNS entry for the IP address, and see if it returns mail.example.com, the idea being that the forward and reverse checks should match. A quick search for a reverse DNS lookup tool will get you a few hits, pick one and put in your server's IP address. I used one called mxtoolbox.com. You might get a result a bit like this:
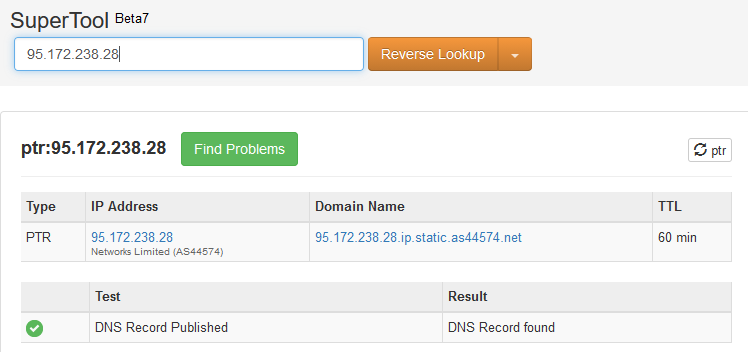
Not the snappiest domain name
That's a long string of stuff under the "Domain Name" heading. Importantly, it's NOT the address of my mailserver. The most relevant bit is the as44574 bit, which you'll notice matches the "Networks Limited (AS44574)" line to the left. "AS" stands for "Autonomous System", which is a self-contained network that makes up part of the Internet. IP addresses are, ultimately, assigned to an autonomous system, and will then get delegated to you as a server owner. This is handy - it means that if someone falsely advertises that they control your IP address, because the announcement comes from the wrong autonomous system other bits of the Internet will spot the lie and ignore it. If you want to dig into how the Internet is put together a bit more, have a search for autonomous systems and Border Gateway Protocol (BGP).
For us right now, the problem we have is that a reverse DNS lookup of our IP address just says "the IP address belongs to this autonomous system", it's not linked to us. To fix this, we want to add a PTR DNS record, so that we get a result like this:
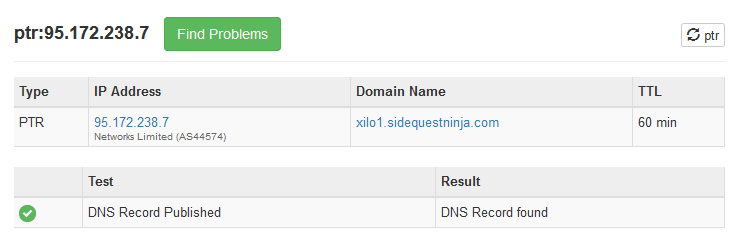
I'll reverse your DNS, mister
(I know the IP addresses are slightly different, I'd already fixed this on my end before I thought to take a picture). Here the lookup shows that the IP address points to my mailserver. So a DNS lookup on the mailserver name gives the IP address, and a lookup on the IP address gives the name of the mailserver. If these match, the mailserver receiving your email can be confident that our server has the permission of the domain owner to be sending email, and therefore is less likely to be spam.
Actually adding a PTR record, however, is probably out of your hands. I had to raise a support ticket with my hosting provider. Tell them you need a PTR DNS record from your IP address to the name of your mailserver and you should be sorted. Having either the forward or reverse check fail is what will trigger the reject_unknown_client_hostname restriction we put into smtpd_recipient_restrictions back in Part 4, so we're already rejecting mail that fails this check.
SPF
While you're waiting for that, we can look at the other bits. Let's start with the easiest one, SPF. This stands for "Sender Policy Framework", and it's used to prevent spammers forging your email address - claiming to be sending email from you when they're not. By adding an SPF record to your DNS setup, you're announcing, as the domain's controller, who is allowed to send email from your domain. You can add an SPF record for your domain as a DNS TXT ("text") record. TXT records were originally conceived as ways to associate arbitrary, human-readable info with a domain, but they're now also used for various different things by putting using a key-value pair as the text string. For more complicated setups, an SPF record might be fairly involved, but for our simple setup, all you need to do is create a new DNS TXT record with the Host set to your domain (e.g. example.com) and the record itself set to:
v=spf1 mx -all
The v=spf1 part flags this up as your domain's SPF record. Mailservers will hit the DNS records for your domain and look for a TXT record that starts with this. The rest indicates which resources are, and aren't, allowed to send mail for your domain. mx, which is equivalent to +mx (the + is optional), means that we're announcing to the world that anything configured in an MX DNS record for our domain is allowed to send email. That makes sense, it would be weird if they weren't. -all means that email from any other source should be rejected as a forgery. Simple! The limitation of this is that this only prevents forging of the envelope address (the address that the sender tells the other mailserver the email is from). It doesn't prevent forging the From header in the email, which is what the human reading the email actually sees. This means that although spammers can't forge email from our domain, they can still construct an email that looks to a human like it comes from us. We can fix this loophole later with DMARC. If you want to test your SPF setup, just send another email to the verifier tool.
SPF check:          pass
"iprev" check:      pass
DKIM check:         none
SpamAssassin check: ham
Woop, progress, SPF is now working. We should also get our Postfix installation to check the SPF policy of incoming mail so that it can, for example, act on a -all check someone else has set and spot forged email that doesn't come from an approved server. There's a Postfix plugin for this, which we'll need to install.
apt-get install postfix-policyd-spf-python
There's a Perl version as well as the Python one, but let's be reasonable about this. We'll tell Postfix about the plugin and how to use it by adding a new service in master.cf:
policyd-spf unix - n n - 0 spawn user=policyd-spf argv=/usr/bin/policyd-spf
This creates a service called policyd-spf, which when triggered spawns a new process to do the check. Postfix will pass it the email and the process will return the result. Head over to main.cf and we can tell Postfix when to use the policy checker. We add it to the end of the smtpd_recipient_restrictions list:
smtpd_recipient_restrictions=reject_unknown_client_hostname,check_policy_service unix:private/policyd-spf
Once Postfix's config has been reloaded, you'll be doing SPF checking. Send an email from elsewhere and check the headers when it arrives - assuming the domain you sent the email from has its SPF set up properly, you should see a header reading something like Received-SPF: Pass (mailfrom), followed by the details of the sending domain and address.
DKIM
Next, DKIM. This stands for "DomainKeys Identified Mail" (DomainKeys is one word). This provides proof that an email that appears to come from our domain actually did, using digital signing. We publish a public key as a DNS record, and use a private key to add a digital signature to each outgoing email. Only we can generate the signature, because we're the only ones with the private key, but anyone can use the public key to verify that the signature is valid. So, we sign an email, the mailserver receiving it verifies the signature using the DNS record, and if the signature passes, it can be sure that the email really did come from us. Success. This is much more involved than SPF, because we need to configure the public-private key pair, and get Amavis to start signing our emails for us. Amavis has supported this since version 2.6, with older versions you needed to use something like opendkim to provide this functionality. First, let's tell Amavis that we want to start supporting DKIM. Open up /etc/amavis/conf.d/50-user and add the following:
$enable_dkim_verification = 1;
$enable_dkim_signing = 1;
For verifying DKIM keys on incoming mail, that first line is all we need, which is nice. For signing outgoing mail, there's more to do. Next we need to tell Amavis where the DKIM key is, like this:
dkim_key('example.com', '20200129', '/etc/amavis/dkim/example.com.pem');
The first argument to dkim_key tells Amavis what domain it's for, and the last argument tells it where to find the private key (we'll create it in a moment). The bit in the middle is the "selector", which gets included with the signature in the email header and tells the receiving end the name of the DKIM DNS record to use to find the public key. It doesn't matter what this is, but I suggest you set it to today's date. It's a good idea to change your DKIM keys occasionally, but you need to make sure you don't break DKIM verification of your outgoing emails when you do. When you change keys, you want to add a new DNS record and leave the old one up for a while so that a mailserver that receives an email from you after a delay can still verify the old signature. The date's as good a way as any to tell one DKIM record from another. The selector I've used here tells a receiving mailserver to look for a TXT record called 20200129._domainkey.example.com. Next, let's create a directory in /etc/amavis for the keys, then tell Amavis to generate a DKIM key for us:
mkdir dkim
cd dkim
amavisd-new genrsa ./example.com.pem 2048
chown amavis:amavis example.com.pem
The chown means that only the amavis user can read the key - since this is our private signing key, we don't want just anyone on the machine looking at it.
Restart Amavis, and you can get then get it to spit out the values you need for your DNS record:
amavisd-new showkeys

; key#1 2048 bits, i=20200129, d=example.com, /etc/amavis/dkim/example.com.pem
20200129._domainkey.example.com. 3600 TXT (
  "v=DKIM1; p="
  "BLAHBLAHBLAHBLAHBLAHBLAHBLAHBLAHBLAHBLAHBLAHBLAHBLAHBLAHBLAHBLAH"
  "BLAHBLAHBLAHBLAHBLAHBLAHBLAHBLAHBLAHBLAHBLAHBLAHBLAHBLAHBLAHBLAH"
  "BLAHBLAHBLAHBLAHBLAHBLAHBLAHBLAHBLAHBLAHBLAHBLAHBLAHBLAHBLAHBLAH"
  "BLAHBLAHBLAHBLAHBLAHBLAHBLAHBLAHBLAHBLAHBLAHBLAHBLAHBLAHBLAHBLAH"
  "BLAHBLAHBLAHBLAHBLAHBLAHBLAHBLAHBLAHBLAHBLAHBLAHBLAHBLAHBLAHBLAH"
  "BLAHBLAH")
You need to turn that into a DNS TXT record with the host set to 20200129._domainkey.example.com and the value set to everything inside the brackets, starting with the v=DKIM1; part, and all of the p= part. After the v=DKIM1; part, add the following: h=sha256; k=rsa;, to be explicit about what kind of key it is (RSA) and its hashing algorithm (SHA256). Once you're done, check that the entire key is present - in the past I've run into hosting providers which truncated DNS records over a certain length, so you'd end up with only half the key, which is no good.
There's one important change we now need to make to our Postfix and Amavis set up. So far all mail, whether incoming or outgoing, has been passed to Amavis using the same service, listening on port 10024. This means that incoming and outgoing mail have been checked for viruses and spam, which is handy. However, we now want to start treating incoming and outgoing mail differently, because we only want to sign outgoing mail. The easiest way to do this is to get Amavis to listen on two ports, and to send incoming mail to one and outgoing to the other. We can then configure Amavis to treat the two streams separately, although it can give them both back to Postfix on the same resubmission port (for now).
First, get Amavis to listen on two sockets. Open 50-user (we're about to override something in 20-debian-defaults here)
$inet_socket_port = [10024,10026]; # listen on two ports
While you're there, set $max_servers to 4 rather than 2, since we're going to have two Postfix entries for sending to Amavis, and we'll set their maxproc to 2 in each case. Save and close, and head over to master.cf in Postfix. Edit the lmtp-amavis service we created before, and add a new one:
# Service to pass to Amavis (incoming mail)
lmtp-amavis-inc unix -      -       -       -       2       lmtp
  -o lmtp_data_done_timeout=1200
  -o lmtp_send_xforward_command=yes
# Service to pass to Amavis (outgoing mail)
lmtp-amavis-out unix -      -       -       -       2       lmtp
  -o lmtp_data_done_timeout=1200
  -o lmtp_send_xforward_command=yes
Also set an override for the content_filter on the submission service:
submission inet n       -       y       -       -       smtpd
...
  -o content_filter=lmtp-amavis-out:[127.0.0.1]:10026
Then head over to main.cf and edit the default content_filter:
content_filter = lmtp-amavis-inc:[127.0.0.1]:10024
This will set the new filter for the smtp service, as well as local mail sending on the pickup service, which would otherwise break (a process trying to mail root to inform you of a problem, for example, wouldn't be able to get through).
Now back to 50-user in Amavis. Add the following:
$interface_policy{'10026'} = 'ORIGINATING';
$policy_bank{'ORIGINATING'} = {
  # allow DKIM signing
  originating => 1,
  # force MTA to convert mail to 7-bit before DKIM signing
  # to avoid later conversions which could destroy signature:
  smtpd_discard_ehlo_keywords => ['8BITMIME'],
};
@dkim_signature_options_bysender_maps = ( {
  '.' => { a => 'rsa-sha256', c => 'relaxed/relaxed', ttl => 21*24*3600 },
} );
There are three parts to this. First, we tell Amavis that anything coming in on socket 10026 should be subject to the ORIGINATING policy. That name is just by convention, it doesn't have any meaning itself. We then define a policy_bank block for ORIGINATING. Here we set the Amavis originating flag to 1 to turn it on - this does have a meaning, in that Amavis knows that if DKIM signing is on, it should sign mail flagged as originating, but not otherwise. As the comment notes, we also force a 7-bit character encoding before signing, so that if some other mailserver elsewhere insists on a 7-byte format it won't change it after we've signed it and therefore invalidate the signature.
Well, that's the idea, anyway, there's a bug in version 2.11.0 of amavisd-new (including the version in the Ubuntu 18.04 bionic repository) which breaks support for setting the originating flag in config, so this doesn't work. Even if you install amavisd-new from the bionic-updates repository (as of January 2020), you'll get a patched version (1:2.11.0-1ubuntu1.1) which fixes the issue when you're using DKIM signing, but not in general. If you see lots of amavisd-new output in the mail log that contains the phrase RelayedOpenRelay then, assuming you haven't misconfigured smtpd_relay_restrictions so that people can use your mailserver to send email from anywhere, you're probably experiencing this bug. The fix was rolled out properly in version 1:2.11.0-6.1.
@dkim_signature_options_bysender_maps tells Amavis how to sign mail based on where it's coming from.
- By only setting a
'.'source, we're telling Amavis to use what follows to sign all mail. The arguments to the right tell it how. - We tell it to use an RSA-SHA256 algorithm - we haven't actually told it which RSA key to use, but since we've only set one DKIM key, and it's an RSA key, it'll use that automatically.
c => 'relaxed/relaxed'tells amavis how to canonicalize the email before it signs it. The two options aresimpleandrelaxed, the problem withsimpleis that if a mailserver tweaks your email slightly in transit (removing newlines, for example), then your signature won't be valid because the email has changed since it was signed.relaxedgets round a lot of these issues. You specify it twice because the first one refers to the mail headers and the other to the body. You can read any number of posts talking about the whys and wherefores of which to use, butrelaxed/relaxedminimizes the chance of your signature becoming invalid. Check the headers of anything you've received from Gmail and you'll see that its DKIM signature usesrelaxed/relaxed.- Finally, the
ttlfield tells the receiving mailserver how long it should consider the signature to be valid for. It's measuring in seconds, so21*24*3600is 21 days (which is fairly arbitrary, it's just something large enough that email ought to get through in that time in the normal course of things). If an email comes in with an expired signature, the receiving end should consider it invalid. When you're rotating your DKIM keys, you should leave the old DNS record up long enough to allow old signatures to be checked if they haven't expired yet.
Restart Postfix and Amavis, send an email, see if it's signed and whether the signature looked valid on the receiving end. The check-auth@verifier.port25.com service can do this for you.
SPF check:          pass
"iprev" check:      pass
DKIM check:         pass
SpamAssassin check: ham
Ding ding ding! We have a winner. The other thing to do is to send a DKIM-signed email from elsewhere to your domain and check that it tries to verify the signature. You should see an Authentication-Results header in the email, with some dkim fields in it.
DMARC
So, finally, DMARC (Domain-based Message Authentication, Reporting and Conformance). DMARC builds on top of SPF and DKIM. With SPF, we noted before that while it means that other mailservers can't pretend to be us and send email from our domain as far as the receiving mailserver is concerned, a spammer can still fake the From field in the email to make it look to the human reading it that we sent it. With DMARC, we can fix that. DMARC insists that the email has to pass either an SPF or DKIM check (or both), and then it insists that the domain in the From field matches either the validated SPF domain or DKIM domain. To support DMARC on outgoing mail, we add a DMARC record to our DNS setup. This tells mailservers receiving mail from us that DMARC is in place, and also tells them what to do if an email fails the DMARC check (options being to do nothing, mark as spam, or reject entirely). You can also supply an email address in the DNS record which other mailservers can use to report stats - numbers of passing and failing emails, and what they did with the failures. This means that you can, if you want, announce a policy for mailservers to take no action on DMARC failure but to send you reports. This is handy when you're setting it up, so you don't accidentally send all your emails into people's spam folders if you set it up wrong. Google has a good article about this, by the way: https://support.google.com/a/answer/2466580 . So, for an initial DMARC setup, I'd recommend going easy. The name of the TXT record should be _dmarc.example.com, and the value should be something like:
v=DMARC1; p=none; adkim=s; aspf=s; rua=mailto:dmarcreporting@example.com;
v=DMARC1;just marks this as a DMARC record, and is required.- The
pfield is also required, this is where you give the action to be taken. This may benone,quarantine(i.e. mark as spam), orreject. There's also an optionalspfield, with the same possible values, for mail from subdomains if you want to treat them differently. adkimandaspfcontrol the Alignment mode for the check. The default isrfor "relaxed", which means that the mail must come from the domain in the SPF/DKIM check, or any valid subdomain.sis "strict", which means the domains must match exactly - if you're not sending mail from subdomains, you can use this safely.ruais the address (or set of addresses, if you comma-separate them) to send aggregated reports to. Themailto:at the start is required. You'll get reports once a day or so from any domain that implements DMARC reporting and that has received any emails from your domain (or allegedly from your domain) that failed the DMARC test. There's also the similarruffield which is where you can ask to receive forensic reports, in real time, of every failed email. However, this can cause you to receive huge numbers of emails if someone is trying to spoof your domain, and the report you receive could include a full copy of the original email, at which point you could be receiving personally identifiable information about people, so there are privacy concerns aboutruf(and some email providers won't send forensic reports, for that reason).- Another optional argument is
pct, which is the percentage of emails to take action on if the DMARC check fails. By default it's 100, but you could set it to, say, 5 when you change the action inp=just in case something goes wrong. Once you're confident, ratchet it up to 100.
You're now DMARC-compliant on the outgoing end, but we're not checking incoming emails for DMARC compliance. Unfortunately, we're going to have to make our Postfix setup a bit more complicated again. Amavis doesn't (yet) support doing DMARC itself, the standard solution is to use opendmarc as a milter from Postfix. However, DMARC checking has to happen after SPF and DKIM (since it relies on those checks having been done). Since we're doing DKIM with Amavis, we need to do the DMARC check after Postfix receives the email back from Amavis. Currently ALL mail coming back from Amavis, whether incoming or outgoing, ends up on the resubmission port 10025. We only want to run the DMARC check on incoming mail, so much like we separated our LMTP queues on the Amavis side, we're going to need a new resubmission queue so we can treat incoming and outgoing mail differently. However, this isn't too bad, it's very similar to the existing one in master.cf.
Open that up, and create a new resubmission service:
# Resubmission service - outgoing
127.0.0.1:10027 inet n  -       n       -       -       smtpd
  -o content_filter=
  -o mynetworks=127.0.0.0/8
  -o smtpd_client_restrictions=permit_mynetworks,reject
  -o smtpd_recipient_restrictions=permit_mynetworks,reject
  -o smtpd_delay_reject=no
  -o smtpd_helo_restrictions=
  -o smtpd_sender_restrictions=
  -o smtpd_data_restrictions=reject_unauth_pipelining
  -o smtpd_end_of_data_restrictions=
  -o smtpd_restriction_classes=
  -o smtpd_error_sleep_time=0
  -o smtpd_soft_error_limit=1001
  -o smtpd_hard_error_limit=1000
  -o smtpd_client_connection_count_limit=0
  -o smtpd_client_connection_rate_limit=0
  -o receive_override_options=no_header_body_checks,no_unknown_recipient_checks,no_milters,no_address_mappings
  -o local_header_rewrite_clients=
  -o smtpd_milters=
  -o local_recipient_maps=
  -o relay_recipient_maps=
Since we used port 10026 on Amavis for originating mail, we'll use 10027 for outgoing mail. It doesn't really matter, it's just a bit neater for incoming mail to be handled by 10024->10025 and outgoing to be 10026->10027.
Then edit 50-user on the Amavis side, to tell the ORIGINATING policy_bank to resubmit to 10027 rather than the default:
$policy_bank{'ORIGINATING'} = {
  # mark as outgoing, so DKIM signing happens
  originating => 1,
  # force MTA to convert mail to 7-bit before DKIM signing
  # to avoid later conversions which could destroy signature:
  smtpd_discard_ehlo_keywords => ['8BITMIME'],
  forward_method => 'smtp:[127.0.0.1]:10027',
  notify_method => 'smtp:[127.0.0.1]:10027',
};
Before you do anything else, restart Amavis and Postfix and make sure mail is still working in both directions. Now for opendmarc.
apt-get install opendmarc
opendmarc puts its config file directly into /etc/opendmarc.conf, so open that up.
For the Ubuntu installation, most of the defaults will do, but there are a couple of things we need to change. We want to get opendmarc to put its listening socket into the same place (more or less) as Amavis, and we need to set a list of hosts to skip when processing mail. We actually want this to be empty. If we don't specify it at all, opendmarc will skip messages received from localhost, but because we're running opendmarc after reinjection from Amavis, that's where the mail has come from. So, change the Socket line, and add a new one:
Socket local:/var/spool/postfix/opendmarc/opendmarc.sock
## Don't ignore localhost, because of the reinjection
IgnoreHosts /etc/opendmarc/ignore.conf
Then run a couple of commands so that that ignore file exists
mkdir /etc/opendmarc
touch /etc/opendmarc/ignore.conf
(touch, if you've never used it, just creates an empty file, which is occasionally useful). Now go into /var/spool/postfix, and create the directory for the socket
mkdir opendmarc
chown opendmarc:opendmarc opendmarc/
adduser postfix opendmarc
The chown means that the opendmarc daemon can create the socket, and adding postfix to the opendmarc group means Postfix can access it as well.
Now we need to tell Postfix to use the milter, but only on the incoming (10025) resubmission port. Edit master.cf, and put the socket in the smtpd_milters override, which used to be empty:
-o smtpd_milters=unix:opendmarc/opendmarc.sock
Also go up to the receive_override_options line and remove the no_milters entry, otherwise our smtpd_milters line will be ignored.
Restart opendmarc and Postfix, and you should be away. Send yourself an email from a service that has posted a DMARC record, and see if it gets checked. You should see a new Authentication-Results header above (and therefore added after) the DKIM one:
Authentication-Results: mail.example.com; dmarc=none (p=none dis=none) header.from=somedomain.com
What we're not doing at the moment is taking any actual action if an email fails to pass the DMARC check. The setting for this is the rather oddly-named (and horrendously-documented, if you look in the config file) RejectFailures option, which you need to set to true:
RejectFailures true
Given the name, and the description in the config file of what it does, you might be led to think that this will reject any email that fails the alignment check, regardless of the policy published by the domain the email claims to be from, but this does actually implement the none/quarantine/reject settings properly. A lot of big email providers such as Gmail and Hotmail have a DMARC record with p=none in it, so a lot of mail you receive you won't be discarded even if it fails. However, many companies, banks, etc, have p=reject for their emails, so you might find you're blocking a proportion of any phishing emails trying to get your bank details etc.
If you want to send aggregated failure reports, you can turn that on with the FailureReports setting, in which case you'll probably also want to specify what opendmarc should set as the From email address when it sends mail out:
FailureReports true
FailureReportsSentBy dmarc@example.com
By default opendmarc will use /usr/sbin/sendmail command to send the reports, you can change that with the ReportCommand option if you want. Don't forget to restart opendmarc if you change any options.
opendmarc did at one point have options for forensic report sending with options called ForensicReports and so on, but they've been retired and will cause opendmarc to fail to start if they're in the config file (just like any other unrecognized config option).
One last thing for opendmarc - by default it doesn't automatically start on system boot, so if you were to reboot your server at this point, opendmarc wouldn't be running. We can fix this by running
systemctl enable opendmarc
By the way, if you read into the docs, you'll see that opendmarc is capable of doing SPF checking itself. However, it's still worth getting policyd-spf to do it before we pass the mail to Amavis so that SpamAssassin can factor the SPF result into its scoring. opendmarc will find the first DKIM and SPF records ("first" when starting from the top, so the most recently-added ones), which means that it'll find the headers from policyd-spf and Amavis, which will protect us from senders adding their own forged Received-SPF and Authentication-Results headers to try to bypass checks. Not only that, but when I tried to send an email with forged "everything's OK!" headers, as suggested here, I found that the manually-added Authentication-Results headers (but not Received-SPF) were being stripped out anyway, and policyd-spf always adds its own header even if there's one already there.
...and there we go. You have a mailserver, it communicates with other mailservers over TLS where possible, whether it's sending or receiving mail. It insists that when you connect using a mail user agent that you have to use TLS. Your email accounts are separate to your Unix accounts, and are managed in a database. Your incoming mails are checked for viruses, spam, and whether they pass SPF, DKIM, and DMARC checks. Your own emails are DKIM signed, and also pass SPF and DMARC checks. You have a pretty sweet server, enjoy!